
Here, we will see installation steps of Asterisk server on Ubuntu 20.04. Also we will cover setting up the Asterisk Realtime configuration. This Asterisk Realtime configuration helps us to store Asterisk configs into mysql database and that also not require to do frequent reload of Asterisk server after making change into config file. Let’s follow below steps to do the proper installation.
Follow below steps on terminal as a root user.
1) Run the below command first to update and upgrade the server.
apt-get update && apt-get upgrade -y2) Install the below dependencies
apt-get install -y build-essential linux-headers-`uname -r` openssh-server apache2 mysql-server mysql-client bison flex php php-curl php-cli php-mysql php-pear php-db php-gd curl sox libncurses5-dev libssl-dev libmysqlclient-dev mpg123 libxml2-dev libnewt-dev sqlite3 libsqlite3-dev pkg-config automake libtool autoconf git subversion unixodbc-dev uuid uuid-dev libasound2-dev libogg-dev libvorbis-dev libcurl4-openssl-dev libical-dev libneon27-dev libsrtp2-dev libspandsp-dev speex libspeex-dev libspeexdsp-dev3) Now, reboot the server.
reboot4) Install PJPROJECT
cd /usr/src/

wget https://github.com/pjsip/pjproject/archive/refs/tags/2.12.1.zip

apt install zip

unzip 2.12.1.zip

cd pjproject-2.12.1

./configure -enable-shared -disable-sound -disable-resample -disable-video -disable-opencore-amr

make dep

make

make install
5) Install libjanson
apt-get install -y libjansson-dev6) Install Asterisk
Now, after installing the required packages we will install Asterisk from source code. To
install from source just follow below steps one by one.
cd /usr/src/
wget http://downloads.asterisk.org/pub/telephony/asterisk/asterisk-18-current.tar.gz
tar -xvzf asterisk-18-current.tar.gz
cd asterisk-18.13.0 (whatever current version you get downloaded, you can go inside that folder)
apt-get install -y libedit-dev
./configure
contrib/scripts/get_mp3_source.sh
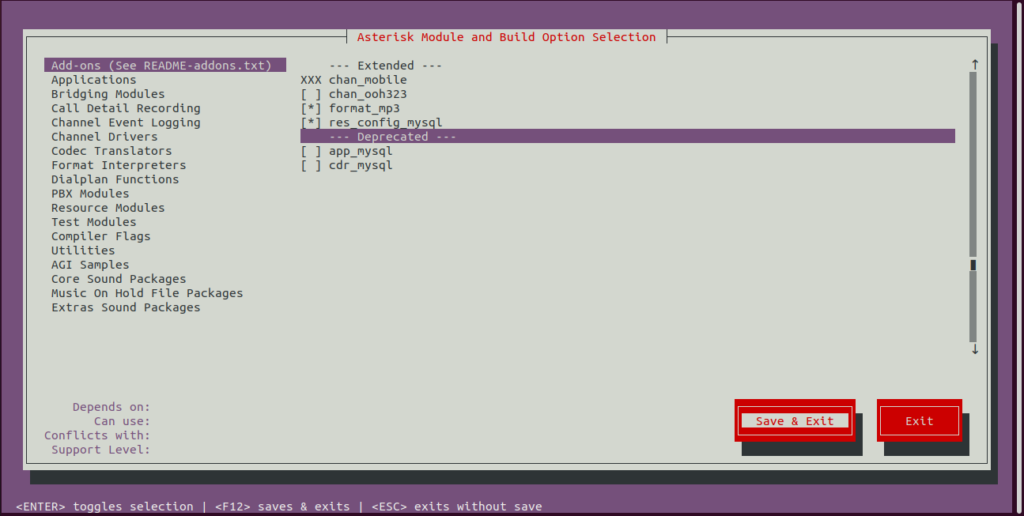
make menuselectWhen you see the screen below just select format_mp3 and res_config_mysql Add ons shown below. And do Save & Exit.
Continue below commands for further installation.
make

make install

make config

ldconfig

make samples
Now, we have installed the Asterisk PBX software.
Start the Asterisk by just applying below command on terminal.
asteriskConnect to Asterisk CLI by below command
asterisk -rvvvv7) Install extra sound files
If you want to install some extra sound files go for below commands. These files can be played on Asterisk server via Playback dialplan application.
cd /var/lib/asterisk/sounds

wget http://downloads.asterisk.org/pub/telephony/sounds/asterisk-extra-sounds-en-wav-current.tar.gz

tar xfz asterisk-extra-sounds-en-wav-current.tar.gz

rm -f asterisk-extra-sounds-en-wav-current.tar.gz
wget http://downloads.asterisk.org/pub/telephony/sounds/asterisk-extra-sounds-en-g722-current.tar.gz

tar xfz asterisk-extra-sounds-en-g722-current.tar.gz

rm -f asterisk-extra-sounds-en-g722-current.tar.gz
8) Installing PJSIP Realtime Support
We have already installed Mysql on the server. We will create one admin database user. Follow below commands to create a user. With the root user you can login easily and create one user. Simply hit enter to connect mysql when it ask for password.
Note: If Mysql service is not running, you can start it with command.
service mysql startmysql -uroot -p
CREATE USER ‘admin’@’localhost’ IDENTIFIED BY ‘8FRf4T’;
GRANT ALL PRIVILEGES ON * . * TO ‘admin’@’localhost’;
FLUSH PRIVILEGES;
EXIT;Install the dependencies below.
apt-get install unixodbc unixodbc-dev python3-dev python3-pip python3-mysqldbCreate database called asterisk
mysqladmin -u admin -p create asteriskInstall below required package
pip3 install alembic OR apt-get -y install alembic
Goto the directory below
cd /usr/src/asterisk-18.13.0/contrib/ast-db-manage/(In your case whatever the latest version you downloaded)
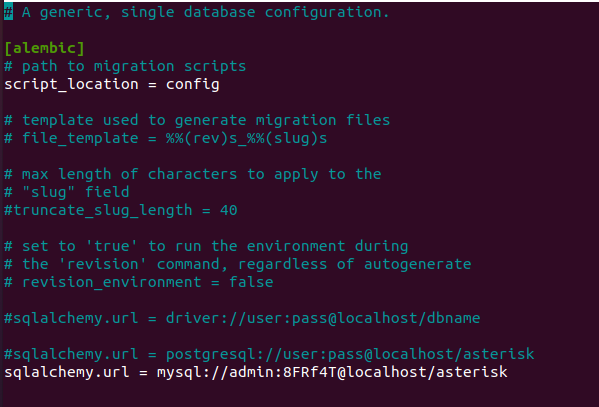
Open the file below and modify line mentioned below with the username and password
nano config.ini.samplesqlalchemy.url = mysql://admin:8FRf4T@localhost/asterisk
After changing the line it should appear as below.
Now copy the file from .sample to normal .ini file
cp config.ini.sample config.iniPerform below command that will create all necessary tables inside asterisk database
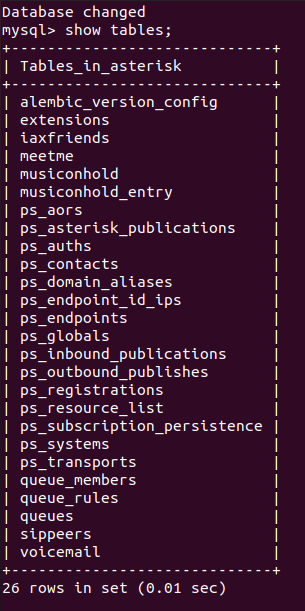
alembic -c config.ini upgrade headAfter above command you will see output something similar to this:

You can now connect to the mysql console and check tables imported. Just check like shown in the snapshot below.
Now modify below configuration files which resides under /etc/asterisk folder. First we will go to Asterisk’s configuration folder path and then back up the existing default files as .orig.
cd /etc/asterisk/

mv extconfig.conf extconfig.conf.orig

mv res_config_mysql.conf res_config_mysql.conf.orig

mv sorcery.conf sorcery.conf.orig
After taking backup of the default files generated by the system, we will create new files to put on our own configurations.
Open the file below and add the content shown. This file mentions we are using mysql driver and connection called general to use real time resources.
nano extconfig.conf[settings]
ps_endpoints => mysql,general,ps_endpoints
ps_auths => mysql,general,ps_auths
ps_aors => mysql,general,ps_aors
ps_domain_aliases => mysql,general,ps_domain_aliases
ps_endpoint_id_ips => mysql,general,ps_endpoint_id_ips
ps_contacts => mysql,general,ps_contacts
ps_registrations = mysql,general,ps_registrations
voicemail => mysql,general,voicemail_users
musiconhold => mysql,general,musiconhold
queues => mysql,general,queues
queue_members => mysql,general,queue_members
nano res_config_mysql.conf[general]
dbhost = 127.0.0.1
dbname = asterisk
dbuser = admin
dbpass = 8FRf4T
dbport = 3306
dbsock = /tmp/mysql.sock
dbcharset = latin1
requirements=warn ; or createclose or createchar
Edit the configuration file and add content shown below.
nano sorcery.conf[res_pjsip]
endpoint=realtime,ps_endpoints
endpoint=config,pjsip.conf,criteria=type=endpoint
auth=realtime,ps_auths
auth=config,pjsip.conf,criteria=type=auth
aor=realtime,ps_aors
aor=config,pjsip.conf,criteria=type=aor
domain_alias=realtime,ps_domain_aliases
contact=realtime,ps_contacts
contact=config,pjsip.conf,criteria=type=contact
[res_pjsip_endpoint_identifier_ip]
identify=realtime,ps_endpoint_id_ips
[res_pjsip_outbound_registration]
registration=realtime,ps_registrations
[res_pjsip_outbound_publish]
outbound-publish=config,pjsip.conf,criteria=type=outbound-publish
[res_pjsip_pubsub]
inbound-publication=config,pjsip.conf,criteria=type=inbound-publication
[res_pjsip_publish_asterisk]
asterisk-publication=config,pjsip.conf,criteria=type=asterisk-publication
After saving all above .conf configuration files just go to Asterisk cli and reload/restart server.
asterisk -rvvvv

core restart now

asterisk -rvvvv

core reload

realtime mysql status
When you check the Realtime status it should show as per below image. Here general connected showing.

Let’s add some users and queue into realtime database with below queries.
Adding user 101:
insert into ps_aors (id, max_contacts) values (‘101’, 1);

insert into ps_auths (id, auth_type, password, username) values (‘101’, ‘userpass’, ‘101’,’101′);

insert into ps_endpoints (id, transport, aors, auth, context, disallow, allow,

direct_media,force_rport,external_media_address,rtp_symmetric,webrtc) values (‘101’,

‘transport-udp-main’, ‘101’, ”, ‘default’, ‘all’, ‘gsm,ulaw,alaw’, ‘no’,’yes’,”,’yes’,’yes’);
Adding user 102:
insert into ps_aors (id, max_contacts) values (‘102’, 1);

insert into ps_auths (id, auth_type, password, username) values (‘102’, ‘userpass’, ‘102’,

‘102’);

insert into ps_endpoints (id, transport, aors, auth, context, disallow, allow,

direct_media,force_rport,external_media_address,rtp_symmetric,webrtc) values (‘102’,

‘transport-udp-main’, ‘102’, ”, ‘default’, ‘all’, ‘gsm,ulaw,alaw’, ‘no’,’yes’,”,’yes’,’yes’);
Adding one queue:
insert into queues (name,timeout,ringinuse,autofill,strategy,joinempty) values (‘customer_support’,’120′,’no’,’yes’,’rrmemory’,’yes’);
Now, Goto Asterisk CLI and hit below commands to check above created realtime resources are visible to Asterisk.
asterisk -rvvvv

pjsip show endpoints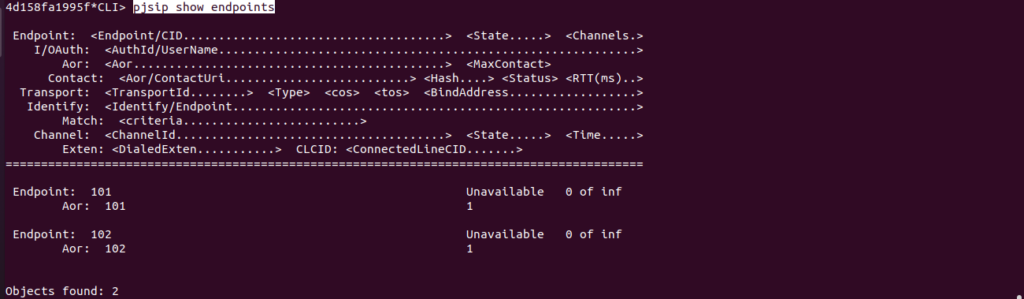
queue show
In the above both commands we can see users 101/102 are loaded from Realtime database and also the queue customer_support displaying.
Great! You have successfully installed the Asterisk server with the Realtime support.