
What is Auto dialer
Auto dialer is the software or piece of code that is capable of doing auto dial to customer numbers and when a customer answers the call it is connected to the call centre Agent. This software or feature in the call centre is intelligent enough that it can decide the availability of Agents, Channels, time conditions and verify any business logic before dialling the customer, so that chances of connecting customers to Agents are increasing. This way customers are served in a better and efficient way.
Why Auto dialer
Auto dialer in call centres is a very useful and important development. When the Agent is sitting in a call centre making a manual call one by one from his/her dialpad then it will be a very slow process to reach customers and the Agent needs to wait till the customer answers the call before trying the next customer. Also after waiting for the full ringing time we are not sure if the customer will pick up the phone or not, that way it was very annoying and tedious work for the Agents.
So, for the solution of this problem Auto dialer development comes into picture. And this auto dialer can be created from scratch with the Asterisk like open source PBX.
How to make Auto dialer
The most easy and efficient way is to use call files in Asterisk to make an auto dialer. Call files are the simple text files in specific format that you can generate as per your business logic and move to a specific directory into Asterisk so the call will be initiated and it will progress into the dialplan.
So, in auto dialer there are two main important things which are mentioned below.
a) Dial customer number
b) Connect customer to Agent
To generate call files, you can see the link below for your reference.
https://wiki.asterisk.org/wiki/display/AST/Asterisk+Call+Files
Here, I am sharing the call file code below that will be used to create auto calls.
Note: 997927XXXX=YOUR_MOBILE_NUMBER
Channel: Local/s@local_call
Context: outbound_dialer
Extension: s
Priority: 1
Setvar: customer_num=997927XXXX
Setvar: queue_name=Customer_support
Setvar: agent_name=69240532
Above details you can save it in a file like test.call and move it to /var/spool/asterisk/outgoing/ directory. As soon as you move the file to that directory the call will be initiated into the dialplan with the Local channel and land into the local_call context.
Now, we have created the call file. But we need to create a dial plan also in Asterisk’s extensions.conf file to handle the call.
I am sharing the dialplan code snippet below which needs to be placed into /etc/asterisk/extensions.conf file.
Open file, nano /etc/asterisk/extensions.conf and add below content into it and save it.
[local_call]
exten => s,1,Noop(Local call generated, CustomerNumber: ${customer_num} AND TeamName: ${queue_name})
same => n,Dial(PJSIP/0${customer_num}@kamtrunk,60)
same => n,Hangup()
exten => h,1,Noop(In local_call context, CustomerNumber: ${customer_num} DialStatus: ${DIALSTATUS})
same => n,AGI(dialer_status.py,${customer_num},${DIALSTATUS},${agent_name})
[outbound_dialer]
exten => s,1,Answer()
same => n,Noop(Customer Answered the call, CustomerNumber: ${customer_num} AND TeamName: ${queue_name} Agent: ${agent_name})
same => n,Dial(PJSIP/${agent_name},60)
same => n,Hangup()
exten => h,1,Noop(In outbound_dialer context, CustomerNumber: ${customer_num} DialStatus: ${DIALSTATUS})
same => n,AGI(dialer_status.py,${customer_num},${DIALSTATUS},${agent_name})
Once you save the above code into extensions.conf file goto Asterisk’s CLI and reload the dialplan to take changes into effect.
asterisk -rvvvv
dialplan reload
You may have noticed the AGI file dialer_status.py which is the agi script to handle the call status. I am sharing sample code of it to receive the variables passed inside the AGI.
Open the file nano /var/lib/asterisk/agi-bin/dialer_status.py and add below content into it and save it.
#!/usr/bin/env python3
import sys
import json
import requests
from asterisk.agi import *
import os
#initialising agi
agi = AGI()
agi.verbose(“Entering into Python AGI…”)
#agi.answer()
#receive data from arguments
customer_num = str(sys.argv[1])
dial_status = str(sys.argv[2])
agent_name = str(sys.argv[3])
agi.verbose(‘CustomerNumber……. %s’ % customer_num)
agi.verbose(‘DialStatus……. %s’ % dial_status)
agi.verbose(‘AgentName……. %s’ % agent_name)
After that need to give permission on that file to be executed. Type below command on the terminal to give permission.
chmod 777 /var/lib/asterisk/agi-bin/dialer_status.py
(Also install required dependencies for this AGI file to be executed)
pip3 install pyst2
Okay, now we are good to go. You can create a call file and move it to that directory to process the call. Once you move the call file into the /var/spool/asterisk/outgoing/ directory following things will happen:
a) Call initiated with Local channel and goes into the local_call context
– Here the customer number is getting dialled, the kamtrunk is the working trunk for me to make PSTN calls. I assume you will have a working SIP trunk registered to your Asterisk server. You can change the name of your trunk as required, kamtrunk=YOUR_TRUNK_NAME.
same => n,Dial(PJSIP/0${customer_num}@kamtrunk,60)
b) Once customer answers the call, it will go to outbound_dialer context
– Here we connect customers to the Agent. We can connect customers to the Agent by two ways, one via Dial the agent or place the call into the Queue() application. The way Dial() OR Queue() you can decide as per your requirement and logic. We have set both queue_name and agent_name channel variables into the call file to consume it into the dialplan.
same => n,Dial(PJSIP/${agent_name},60)
OR
same => n,Queue(${queue_name})
c) local_call and outbound_dialer both the contexts have the hangup handler extension h
exten => h,1,Noop(In local_call context, CustomerNumber: ${customer_num} DialStatus: ${DIALSTATUS})
exten => h,1,Noop(In outbound_dialer context, CustomerNumber: ${customer_num} DialStatus: ${DIALSTATUS})
Remember, in local_call context you will get the DIALSTATUS of the customer and in the outbound_dialer context you will get the DIALSTATUS of the Agent.
Into the AGI dialer_status.py file you can take the status of dialled customer number or agent.
same => n,AGI(dialer_status.py,${customer_num},${DIALSTATUS},${agent_name})
You can place different AGI files also like dialer_status_customer.py in the local_call context and dialer_status_agent.py in the outbound_dialer context to get separate activity status.
How to make actual Auto call
There are now two simple steps to make an auto outbound call, just follow below to do that.
Now, just open nano /tmp/test.call and paste below content into it and save it.
Channel: Local/s@local_call
Context: outbound_dialer
Extension: s
Priority: 1
Setvar: customer_num=997927XXXX
Setvar: queue_name=Customer_support
Setvar: agent_name=69240532
Then move this file to the appropriate directory to process the call.
mv /tmp/test.call /var/spool/asterisk/outgoing/
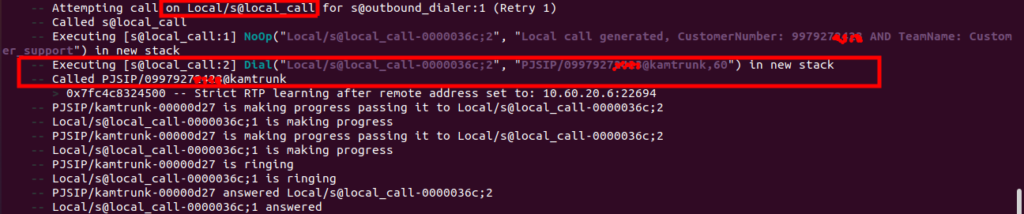
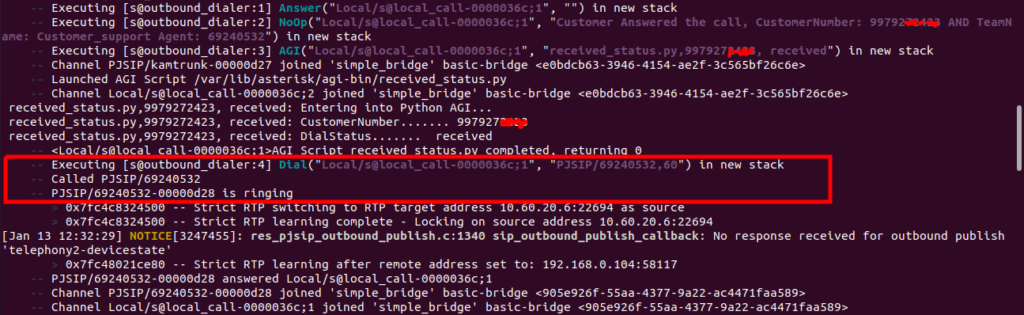
Before moving the file just connect with your Asterisk’s CLI to see the call events into the dialplan. See below images for the actual call progress when you move the call file.
Customer Dial – dial customer into local_call context
Agent Dial – dial agent into outbound_dialer context
Hangup Calls – customer hangup falls into local_call context and agent hangup falls into outbound_dialer context

Note: You can create call file with the help of Python library as well. Here is the link for it, https://pycall.readthedocs.io/en/latest/usage.html#adding-complex-call-logic
Just use command pip3 install pycall to install the library. (It is completely fine to use any language to open simple text based call files and write call file data into it.)
Below is sample Python code that you can use to generate and process call files with the library if you like. Here we do not require to move call file into /var/spool/asterisk/outgoing/ directory. Library itself do this for us.
from pycall import CallFile, Call, Context
#change customer_num as per your customer number
vars = {‘customer_num’:’997927XXXX’,’queue_name’: ‘Customer_support’,’agent_name’:’69240532′}
c = Call(‘Local/s@local_call’,variables=vars)
con = Context(‘outbound_dialer’, ‘s’, ‘1’)
cf = CallFile(c, con)
cf.spool()
So, that’s all about the auto dialer process, hope you like this post and content of it. You can play around the code which I have shared here and build your own custom Auto dialer software.