
Introduction to ARI
The Asterisk Rest Interface is a combination of AGI (Asterisk Gateway Interface) and AMI (Asterisk Manager Interface). AGI and AMI are still the good choice for the Asterisk Developer as it is fast and efficient enough to achieve most of the use cases.
The AGI we can use from Asterisk’s Dialplan to add more custom logic in business call flow like lookup caller id, query the entered number and verify, call external API etc. For using the AGI we need to have complete knowledge of Asterisk extensions.conf file, Dialplan functions and native dialplan language.
AMI is the manager interface that can listen on 5038 port for all the Asterisk events and can perform AMI actions also. The full list of AMI events and actions can be seen on the links below. These events occur as the call progresses.
https://wiki.asterisk.org/wiki/display/AST/Asterisk+18+AMI+Events
https://wiki.asterisk.org/wiki/display/AST/Asterisk+18+AMI+Actions
With ARI we can have power of both AGI and AMI at the same time, so can have better control over the call flow. For example we can take certain actions on events like PlaybackStarted, PlabackFinished, ChannelEnteredBridge, ChannelLeftBridge etc.
With the ARI api requests, we can play with various objects of Asterisk like channels, bridges, recordings etc. Whenever a call goes into Asterisk’s Stasis() dialplan application we receive a StasisStart event on the ari application with the channelid, now we can perform various activities on channel with the channelid like ring on channel, play welcome message, play MOH on channel, add channel into some already created bridge etc. Below I will give a code example also for this to play with ARI applications.
ARI is useful and helpful for the backend developer, web developer, API developers, those who do not know core Asterisk technology and wants to build their own custom communication applications like voicemail app, ivr app and any custom application they think. Remember ARI is not about using existing Asterisk’s applications like Queue(), Voicemail() etc, it is about building your own custom queue, voicemail and any application. You can interact with channels, bridges like resources with the api requests.
How to setup ARI
Here, I will show you how to setup ARI environment into Asterisk server and how to use my Python ARI library to build the ARI application.
1. Setup Asterisk configuration to enable ARI
Open the file, nano /etc/asterisk/http.conf and add below content into it then save.
[general]
enabled=yes
bindaddr=0.0.0.0
bindport=8088
Open the file, /etc/asterisk/ari.conf and add below content into it then save.
[general]
enabled = yes
pretty = yes
allowed_origins = *
[asterisk]
type = user
read_only = no
password = asterisk
Open the file, nano /etc/asterisk/extensions.conf and add below content into it then save. Here outgoing is the context for my sip endpoint with which I will test ARI call later in this post.
[outgoing]
exten => 123,1,Answer()
same => n,Stasis(hello-world)
same => n,Hangup()
After modifying above configuration files we need to reload the Asterisk.
asterisk -rvvvv
core reload (OR core restart now – If any of the changes are not picking up by Asterisk)
2. Starting Python ARI app
First some dependencies need to be installed by commands mentioned below.
pip3 install websockets
pip3 install requests
Then you can do git clone from my Github repository as below,
git clone https://github.com/ankitjayswal87/ARI-Client.git
Once you clone the repository, you will find the file my_ari_app.py inside the folder. This is the main application file which needs to run from the CLI.
python3 my_ari_app.py
(You can also run this app with nohup to run it into background, nohup python3 /var/www/html/ARI/my_ari_app.py &)
Now, if you see into config.py file, there is APP = ‘hello-world’
This is the name of ARI application, and we need to use same name into the Stasis dialplan application so the call gets connected to the running ARI application. See below dialplan code which puts the call into Stasis(hello-world) dialplan application, and once the call goes into Stasis it will be connected to our ARI application called ‘hello-world’ which we mentioned above.
[outgoing]
exten => 123,1,Answer()
same => n,Stasis(hello-world)
same => n,Hangup()
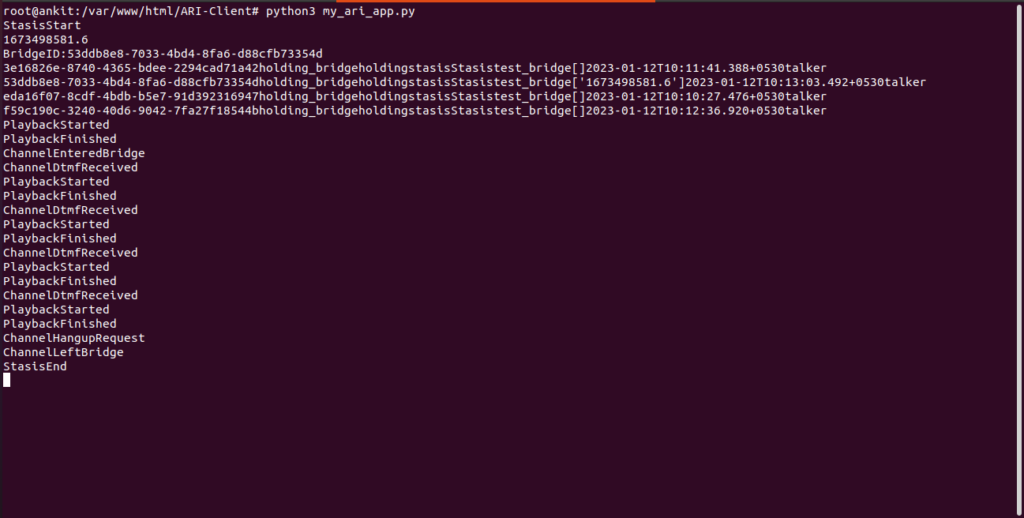
Now I can dial 123 number from my registered SIP endpoint to check the ARI Application. See the below events occurred as the call placed into the stasis dialplan Application.
Python ARI APP log:
Asterisk call log:
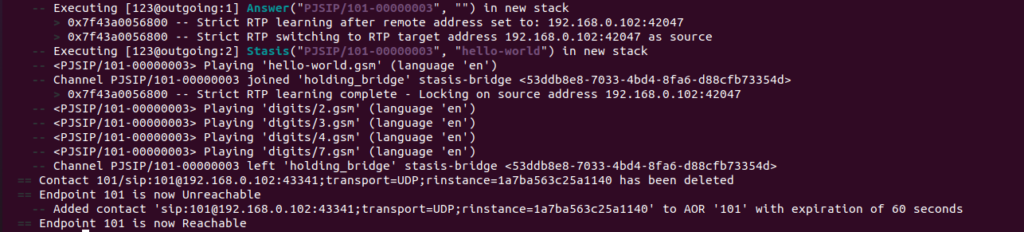
As you can see in above python ARI app logs, we received various events like StasisStart, ChannelEnteredBridge, ChannelDtmfReceived, PlaybackStarted, PlaybackFinished, ChannelHangupRequest, ChannelLeftBridge, StasisEnd. You can do any action on these events, received on the file my_ari_app.py. So, this way you can understand we have better control over the call flow. Above we see how we can add incoming channels into stasis, create bridge, add channel into bridge, play dtmf and hello-world prompt on channels etc. This way you can play around the functions mentioned into the ari_class.py file, also you can add your own functions here to use. I have covered most of the useful functions but still you can add new functions if required. For example you can see at link,
https://wiki.asterisk.org/wiki/display/AST/Asterisk+18+Channels+REST+API
Here, you will find the updated document for the api requests which are supported by Asterisk channels.
Useful ARI Requests to play manually with Channels:
Make sure your Asterisk server is running and the Python ARI app my_ari_app.py also running in the background. Then you will be able to test the below API requests.
Create and Dial Channel:
curl -v -u asterisk:asterisk -X POST “http://localhost:8088/ari/channels/create?endpoint=PJSIP/101&app=hello-world”
curl -v -u asterisk:asterisk -X POST “http://localhost:8088/ari/channels/1674108783.7/dial”
(where 1674108783.7 = channelid)
Play prompt on channel:
curl -v -u asterisk:asterisk -X POST “http://localhost:8088/ari/channels/1674108783.7/play?media=sound:demo-congrats”
(where 1674108783.7 = channelid)
Play MOH on channel:
curl -v -u asterisk:asterisk -X POST “http://localhost:8088/ari/channels/1674108783.7/moh?mohClass=default”
(where 1674108783.7 = channelid)
Stop MOH on channel:
curl -v -u asterisk:asterisk -X DELETE “http://localhost:8088/ari/channels/1674108783.7/moh”
(where 1674108783.7 = channelid)
Create Bridge:
curl -v -u asterisk:asterisk -X POST “http://localhost:8088/ari/bridges?name=ankit&type=holding”
Get all Bridge Details:
curl -v -u asterisk:asterisk -X GET “http://localhost:8088/ari/bridges”
Get Bridge Details:
curl -v -u asterisk:asterisk -X GET “http://localhost:8088/ari/bridges/29a80121-9d43-4342-b035-c0a9de37598a”
(where 29a80121-9d43-4342-b035-c0a9de37598a = bridgeid)
Delete Bridge:
curl -v -u asterisk:asterisk -X DELETE “http://localhost:8088/ari/bridges/29a80121-9d43-4342-b035-c0a9de37598a“(where 29a80121-9d43-4342-b035-c0a9de37598a = bridgeid)
Add Channel in Bridge:
curl -v -u asterisk:asterisk -X POST “http://localhost:8088/ari/bridges/29a80121-9d43-4342-b035-c0a9de37598a/addChannel?channel=1646377582.23”
(where1646377582.23 = channelid)
Remove Channel from Bridge:
curl -v -u asterisk:asterisk -X POST “http://localhost:8088/ari/bridges/29a80121-9d43-4342-b035-c0a9de37598a/removeChannel?channel=1646377582.23”
(where 1646377582.23 = channelid)
Set variable on channel:
curl -v -u asterisk:asterisk -X POST “http://localhost:8088/ari/channels/1648474563.2/variable?variable=company&value=123″
(where 1648474563.2 = channelid)
Set header value on channel:
curl -v -u asterisk:asterisk -X POST “http://localhost:8088/ari/channels/1648476402.6/variable?variable=PJSIP_HEADER(add,X-myclient)&value=007″
(where 1648476402.6 = channelid)
Use case
I am thinking, we can build a custom queue with this ARI application. We know the Asterisk has an inbuilt Queue() application which has been working very fine for a long time and is a very useful application till now.
But we can not share this Queue() application between Asterisk servers. I mean to say suppose we have created one test_queue in a realtime database and both Asterisk servers are accessing the same database for the queue object. Now when the calls are coming to both servers and placed into test_queue , both servers will behave separately for that queue. On both servers it will show different amounts of answered calls, caller’s position in the queue etc. In short we can not scale a large number of calls to a single queue entity.
This situation can be sorted with the ARI custom queue. We can create a new bridge for every incoming call coming to the server and when an incoming call is added to the bridge we can dial SIP Agent to connect with that particular bridge and customer.
For example, see below two calls for the sales queue,
Incoming Call => Asterisk1 => Stasis => bridge-chjhcbhja_sales => Find available agent and connect with this created bridge.
Incoming Call => Asterisk2 => Stasis => bridge-csbdcnca_sales => Find available agent and connect with this created bridge.
Here, you can get details from all bridges and can count numbers of channels inside it. If there is only one channel in bridge you can say the caller is waiting in queue, if there are two channels found then you can say number of bridged calls (running calls).
{
“id”: “29a80121-9d43-4342-b035-c0a9de37598a”,
“technology”: “holding_bridge”,
“bridge_type”: “holding”,
“bridge_class”: “stasis”,
“creator”: “Stasis”,
“name”: “ankit”,
“channels”: [“1674114338.8”],
“creationtime”: “2023-01-19T12:23:47.380+0530”,
“video_mode”: “talker”
* Connection #0 to host localhost left intact
}
Obviously with this approach we can scale the custom single queue application among multiple Asterisk servers, but we have to take into account each and every counter (like number of callers in queue, answered calls in queue, queue position etc.) which is auto managed by the traditional Queue() application of Asterisk.