
After, successfully installing the Asterisk server via link https://telephonyhub.in/2023/02/17/how-to-install-asterisk-on-ubuntu-20-04-with-realtime-setup/ now following extra packages needs to be installed to setup CPaaS platform. Hit below commands on the terminal as root user on your Asterisk server.
pip3 install Flask
pip3 install Flask-Limiter
pip3 install pyst2
pip3 install mysql-connector-python
pip3 install azure-cognitiveservices-speech
pip3 install boto3
pip3 install awscli
pip3 install pycall
pip3 install panoramisk
pip3 install phonenumbers
pip3 install wget
pip3 install python-dotenv
pip3 install pandas
pip3 install validators
pip3 install screenutils
apt install mpg123
apt install unixodbcdev libmysqlclient-dev
apt install libmysqlclient-dev
pip3 install gunicorn
pip3 install asterisk-ami
pip3 install googletrans==4.0.0-rc1
pip3 install openai==0.27.9
Spacy Library Installation:
This library we can install for detecting some entities like date, time, person etc.
pip3 install -U pip setuptools wheel
pip3 install -U spacy
python3 -m spacy download en_core_web_sm
pip3 install date-spacy
Get MYSQL Connector from below link and setup:
Now installing mysql connector for ODBC from link, https://docs.informatica.com/integration-cloud/cloud-data-integration-connectors/current-version/mysql-connector/introduction-to-mysql-connector/administration-of-mysql-connector/installing-mysql-odbc-driver/installing-mysql-odbc-driver-on-linux.html
Once you download the mysql connector source just extract it and move to /usr/src location via below commands,
tar -xvzf mysql-connector-odbc-8.1.0-linux-glibc2.28-x86-64bit.tar.gz
mv mysql-connector-odbc-8.1.0-linux-glibc2.28-x86-64bit /usr/src/
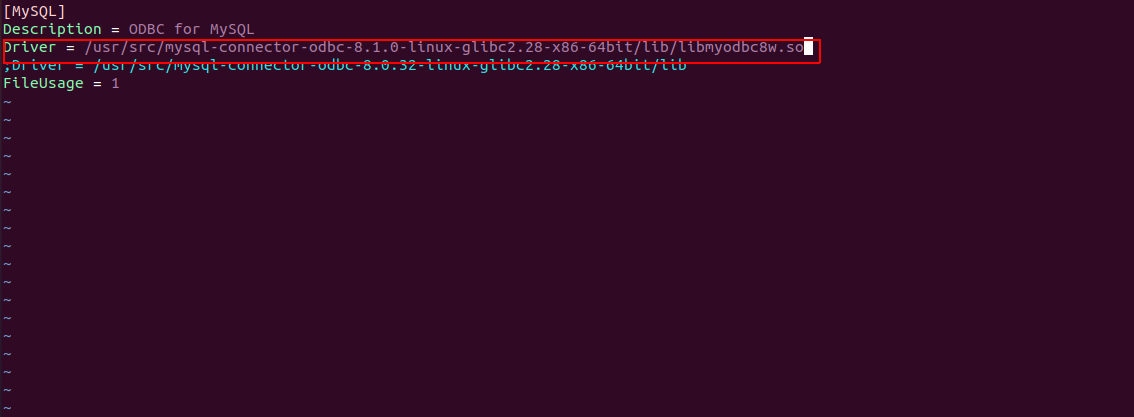
Edit file, vim /etc/odbcinst.ini and update appropriate Driver path of mysql connector as per your downloaded version.
Get CPaaS source code and link it to appropriate directory:
cd /home/ubuntu/
coming soon - contact me
cd /var/lib/asterisk/agi-bin/
mkdir cpass
ln -s /home/ubuntu/CPaaS/agi-bin/*.py /var/lib/asterisk/agi-bin/cpass/
cd /var/www/html/
mkdir daemon
ln -s /home/ubuntu/CPaaS/daemon/*.py /var/www/html/daemon/
ln -s /home/ubuntu/CPaaS/daemon/*.php /var/www/html/daemon/
cd /var/www/html/
mkdir api
ln -s /home/ubuntu/CPaaS/api/*.py /var/www/html/api/
cd /var/www/html/
mkdir ast-ami
ln -s /home/ubuntu/CPaaS/ast-ami/*.py /var/www/html/ast-ami/
Some Additional folder creation and MOH
mkdir /var/log/cpaas_log
mkdir /root/recordings/
mkdir /var/lib/asterisk/bot-music
cp /var/lib/asterisk/moh/reno_project-system.wav /var/lib/asterisk/bot-music/
rm -i /etc/asterisk/musiconhold.conf
ln -s /home/ubuntu/CPaaS/ast-configs/musiconhold.conf /etc/asterisk/musiconhold.conf
Remove below existing files from server first
rm /etc/asterisk/cdr.conf
rm /etc/asterisk/cdr_odbc.conf
rm /etc/asterisk/cdr_adaptive_odbc.conf
rm /etc/asterisk/extconfig.conf
rm /etc/asterisk/extensions.conf
rm /etc/asterisk/features.conf
rm /etc/asterisk/manager.conf
rm -i /etc/asterisk/res_config_mysql.conf
rm -i /etc/asterisk/res_odbc.conf
rm -i /etc/asterisk/sorcery.conf
Now, link the files from the source code
ln -s /home/ubuntu/CPaaS/ast-configs/cdr.conf /etc/asterisk/cdr.conf
ln -s /home/ubuntu/CPaaS/ast-configs/cdr_odbc.conf /etc/asterisk/cdr_odbc.conf
ln -s /home/ubuntu/CPaaS/ast-configs/cdr_adaptive_odbc.conf /etc/asterisk/cdr_adaptive_odbc.conf
ln -s /home/ubuntu/CPaaS/ast-configs/extconfig.conf /etc/asterisk/extconfig.conf
ln -s /home/ubuntu/CPaaS/ast-configs/extensions.conf /etc/asterisk/extensions.conf
ln -s /home/ubuntu/CPaaS/ast-configs/extensions_cpass.conf /etc/asterisk/extensions_cpass.conf
ln -s /home/ubuntu/CPaaS/ast-configs/features.conf /etc/asterisk/features.conf
ln -s /home/ubuntu/CPaaS/ast-configs/manager.conf /etc/asterisk/manager.conf
ln -s /home/ubuntu/CPaaS/ast-configs/res_config_mysql.conf /etc/asterisk/res_config_mysql.conf
ln -s /home/ubuntu/CPaaS/ast-configs/res_odbc.conf /etc/asterisk/res_odbc.conf
ln -s /home/ubuntu/CPaaS/ast-configs/sorcery.conf /etc/asterisk/sorcery.conf
cp /home/ubuntu/CPaaS/ast-configs/pjsip.conf /etc/asterisk/
Now, link the ODBC driver related files,
mv /etc/odbc.ini /etc/odbc.ini.old
ln -s /home/ubuntu/CPaaS/ast-configs/odbc.ini /etc/odbc.ini
mv /etc/odbcinst.ini /etc/odbcinst.ini.old [IF REQUIRED]
ln -s /home/ubuntu/CPaaS/ast-configs/odbcinst.ini /etc/odbcinst.ini
Add your credentials to .env file, this will contain all necessary AWS, Azure keys and cpaas constant values.
cd /var/lib/asterisk/agi-bin/cpass/
vim .env
Import asterisk.sql database available in github source code,
mysql
DROP DATABASE asterisk;
CREATE DATABASE asterisk;
mysql -uadmin -p asterisk < asterisk.sql
Now, check and change DB credentials in below files,
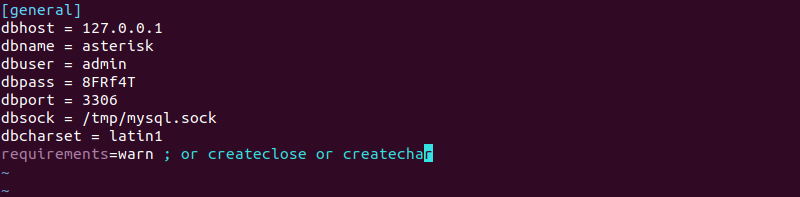
vim /etc/asterisk/res_config_mysql.conf , it should look like below.
[general]
dbhost = 127.0.0.1
dbname = asterisk
dbuser = admin
dbpass = 8FRf4T
dbport = 3306
dbsock = /tmp/mysql.sock
dbcharset = latin1
requirements=warn ; or createclose or createchar
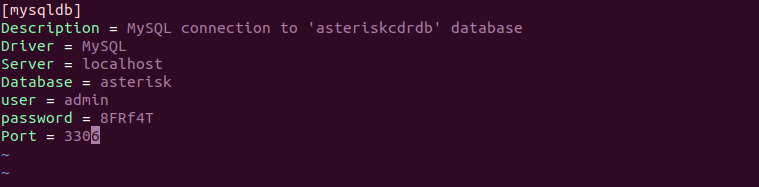
vim /etc/odbc.ini , it should have below details.
[mysqldb]
Description = MySQL connection to 'asteriskcdrdb' database
Driver = MySQL
Server = localhost
Database = asterisk
user = admin
password = 8FRf4T
Port = 3306
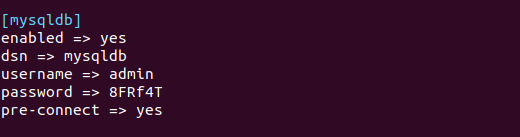
vim /etc/asterisk/res_odbc.conf , It should have below [mysqldb] connection details.
[mysqldb]
enabled => yes
dsn => mysqldb
username => admin
password => 8FRf4T
pre-connect => yes
Run below script to modify listening on port for Asterisk,
python3 /home/ubuntu/CPaaS/daemon/start_asterisk_on_boot.py
Check, vim /etc/asterisk/pjsip.conf
The values of external_media_address, external_signaling_address and local_net should be replaced with your server IPs. If not then modify manually.
Modify Dial string as per your SIP trunk provider requirement, [If required]
In extensions.conf and extensions_cpass.conf files you may require to update Dial string as mentioned below,
E.g customer_number = 9199791365XX
Default Dial String: Dial(PJSIP/+${customer_number}@${trunk_name},60,b(set_header_values^s^1))
Updated Dial String: Dial(PJSIP/0${customer_number:2}@${trunk_name},60,b(set_header_values^s^1))
Start the important screens,
Note: If apache2 is already running on the server just stop it as python flask app will also run on port 80.
systemctl stop apache2
cd /var/www/html/api/
screen -S flask_cpaas
python3 flask_cpass.py
cd /var/www/html/ast-ami
screen -S ast_ami
python3 ami_event.py
Add crontab scripts
crontab -e
*/1 * * * * /usr/bin/python3 /var/www/html/daemon/start_campaign.py
*/1 * * * * /usr/bin/python3 /var/www/html/daemon/dial_campaign.py
*/1 * * * * /usr/bin/python3 /var/www/html/daemon/complete_campaign.py
#Callback daemon
*/1 * * * * /usr/bin/python3 /var/www/html/daemon/dial_callback.py
#Monthly CDR generation daemon
0 0 1 * * /usr/bin/python3 /var/www/html/daemon/monthly_cdr.py
Finally allow SIP (5080) and appropriate RTP ports to server.
Note:- The server timezone should be in UTC, to run campaign properly.
Once you setup everything you can register one sip user and dial number 15168XXXXXX to check IVR Flow,
SIP User:
User: 101
Pass: 101
Host: YOUR_SERVER_IP:5080
This sip user you can register in your soft phone and dial 15168XXXXXX to check IVR. When call comes to this number it will check the incoming_voice_url associated with the DID number and generate IVR app to process.
Number 15168XXXXXX => http://localhost:80/api/incall
Here, incall is the function in Flask screen (flask_cpaas), which we started earlier.
Likewise, Number 15168XXXXXX => http://localhost:80/api/incall_demo
When you dial 15168XXXXXX number it will connect to VoiceBot app.
As this platform provides VoiceBot also, we need to setup one RASA NLP engine to query for user voice inputs. For this we will setup one RASA server on different host machine.
RASA NLP Setup – Installation & Configuration
Check if your Python environment is already configured
python3 --version
pip3 --version
If these packages are already installed, these commands should display version numbers for each step. If not installed you can install via below commands.
apt update
apt install python3-dev python3-pip
Install some additional packages of particular version
apt install python3-testresources
pip3 install numpy==1.22
pip3 install urllib3==1.26.11
pip3 install pyopenssl --upgrade
Make sure your pip version is up to date
pip3 install -U pip
Install Rasa Open Source
pip3 install rasa
Once RASA server is installed you can copy some rasa files from the source code as below to have some working test bot for you.
Go to root folder and clone the source code on RASA server
cd /root/
git clone https://github.com/ankitjayswal87/CPaaS.git
Go to your rasa project folder, lets say /home/ubuntu is your rasa project folder. And copy files to there.
cd /home/ubuntu/
rasa init
cp /root/CPaaS/rasa/domain.yml .
cp /root/CPaaS/rasa/nlu.yml data/.
cp /root/CPaaS/rasa/stories.yml data/.
Train RASA server and start it inside screen
rasa train
screen -S rasa_server
rasa run --enable-api
After running the rasa server in screen you can come out from screen with Ctrl+AD , and now hit below CURL request to confirm your rasa server is working fine.
curl -XPOST http://localhost:5005/model/parse -s -d '{ "text": "hi" }'
If everything goes fine then it should return below response.
{"text":"hi","intent":{"name":"greet","confidence":0.9999986886978149},"entities":[],"text_tokens":[[0,2]],"intent_ranking":[{"name":"greet","confidence":0.9999986886978149},{"name":"bot_challenge","confidence":6.030575718796172e-7},{"name":"goodbye","confidence":3.9811385477150907e-7},{"name":"mood_great","confidence":2.708324586819799e-7},{"name":"mood_unhappy","confidence":3.8664886403694254e-8},{"name":"deny","confidence":3.485826738369724e-8},{"name":"affirm","confidence":1.9127734063317803e-8}],"response_selector":{"all_retrieval_intents":[],"default":{"response":{"responses":null,"confidence":0.0,"intent_response_key":null,"utter_action":"utter_None"},"ranking":[]}}}
Now, on Asterisk main server you have to change RASA_HOST in .env file.
vim /var/lib/asterisk/agi-bin/cpass/.env
Provide your RASA server IP address (public or local) which is accessible from your Asterisk server.