
In India the telecom providers are providing SIP trunk services with physical cables. The TATA, Airtel, Vodafone like companies provide such services over the physical connections. They terminate one cable to your premises and that can go into your physical server’s network port. The server can be in a datacenter or in your office location. Thus your SIP server (Kamailio, Asterisk, Freeswitch etc.) will have two network interfaces, one for the server’s local IP address and one for the TATA customer IP address.
Okay, so here we will discuss the TATA sip trunk configuration with the Kamailio sip server.
Whenever you purchase the SIP trunk line from TATA, it provides below information to you.
| Customer IP | 10.52.26.98 |
| Subnet Mask | 255.255.255.248 |
| Gateway IP | 10.52.26.97 |
| SBC IP | 10.60.19.14 |
| Source PBX | 5060 |
| Destination SBC port | 5061 |
| Display Name | 912269XXXXXX |
| User Name | 912269XXXXXX |
| Password | 1234 |
| Domain | 10.60.19.14 |
| Proxy | 10.60.19.14:5061 |
In above details you can see TATA provides the SIP trunk on one separate /29 network. For the IP 10.52.26.98 we can have below information about the network. You can observer in the /29 network we obtain,
Total Number of Hosts : 8
Number of Usable Hosts : 6
Usable Host IP Range : 10.52.26.97 – 10.52.26.102
This means you can configure a total six usable hosts with the Tata IP addresses if required. (For an example, You need three IP addresses in your architecture of 1 LB (Kamailio) and 2 Media Servers (Asterisk)). Below are the detailed network information in the table.
| IP Address | 10.52.26.98 |
| Network Address | 10.52.26.96 |
| Usable Host IP Range | 10.52.26.97 – 10.52.26.102 |
| Broadcast Address | 10.52.26.103 |
| Total Number of Hosts | 8 |
| Number of Usable Hosts | 6 |
| Subnet Mask | 255.255.255.248 |
| CIDR Notation | /29 |
Ok now we have the above information available from the TATA. Follow below steps to configure SIP trunk with the Kamailio server.
- Netplan Configuration:
Here, I am using Ubuntu server and Kamailio is installed already on this server. Open the netplan configuration file, nano /etc/netplan/00-installer-config.yamlAdd Tata Customer IP details to this file, as per shown in the below snapshot. Here ens37 is the TATA port configured. You can see we added routes also for the whole Tata network (10.52.26.96/29), SBC IP (10.60.19.14) and Media IPs (10.60.20.6/32, 10.60.20.8/32) via gateway IP 10.52.26.97. This routing is required for proper communication of voice on the call.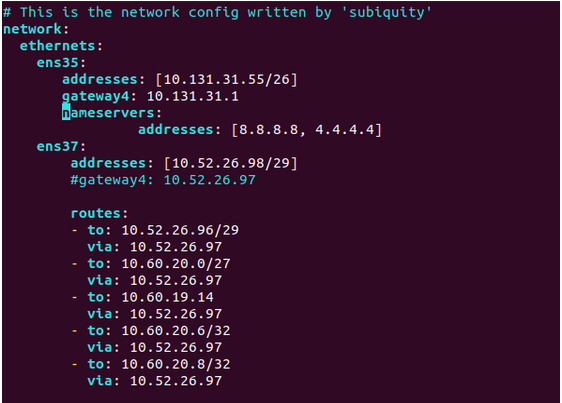 Here, I am sharing the above netplan configs in a file. Click below link to get configs for your reference.
https://pastebin.com/fkTNTjCA
Once the Tata IP configuration is done we should be able to ping the gateway IP address 10.52.26.97 and the SBC IP address 10.60.19.14 from our SIP server. If IP configuration is fine then ping will work to both the IP addresses from our server. - Kamailio Configuration:
In the Kamailio server the configuration file at location /etc/kamailio/kamailio.cfg should have below details.listen=udp:10.52.26.98:5060loadmodule “uac.so”
modparam(“uac”, “reg_db_url”,”mysql://db_user:db_pass@localhost/kamailio”)
modparam(“uac”, “reg_retry_interval”, 180)
modparam(“uac”, “reg_contact_addr”, “10.52.26.98:5060”)Into the Kamailio database we have one table called uacreg in this we need to add one record as below with mysql query.
INSERT INTO uacreg (l_uuid,l_username,l_domain,r_username,r_domain,realm,auth_username,auth_password,auth_proxy,expires,socket) VALUES (‘00912269XXXXXX’,’00912269XXXXXX’,’10.60.19.14:5061′,’00912269XXXXXX’,’10.60.19.14:5061′,’00912269XXXXXX@ngn.ttl.in’,’00912269XXXXXX’,’1234′,’sip:10.60.19.14:5061′,’120′,’10.52.26.98:5060′);
Now, restart the Kamailio service and check the REGISTER request sent to Tata SBC from our server.
You can restart Kamailio service with command,systemctl restart kamailio
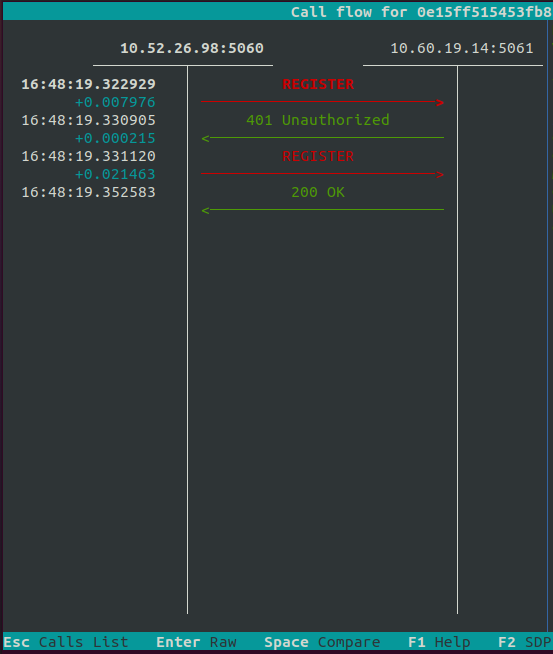
The REGISTER request should reach to Tata SBC IP and should register fine with 200 OK responses as per shown in the below image. You can check this REGISTER request with sngrep utility. (If sngrep is not installed, you can install it via apt install sngrep command)
Once the line is registered you will be able to receive incoming calls on the server. Dial any DID number provided by Tata and check the INVITE request coming on the server for the call.